How To Draw A Book: Easy Step By Step Tutorial You’ll Love
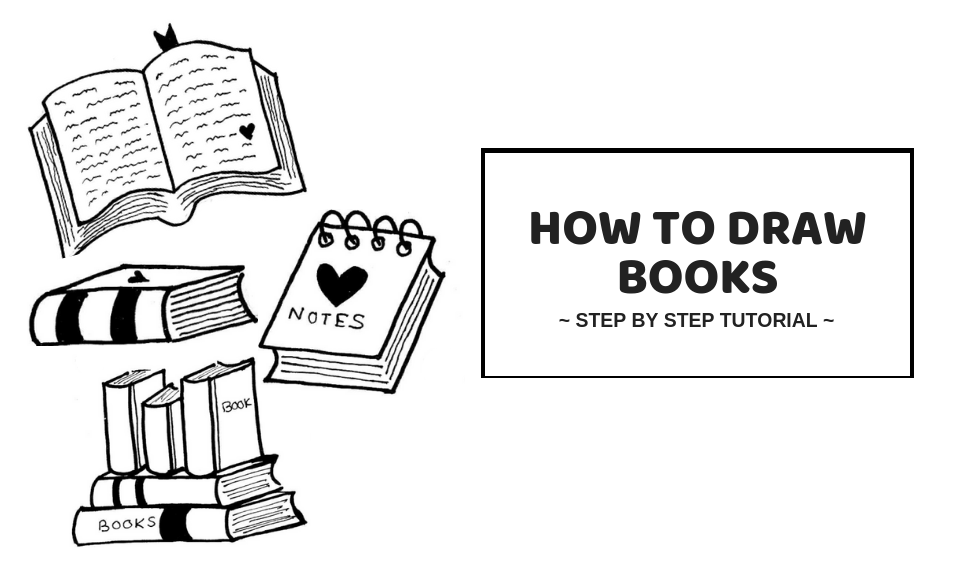
Do you want to learn how to draw a book? Maybe you want to draw a notebook, an open book or even a stack of books? Then you’ve come to the right place. We’ve put together a detailed step-by-step tutorial that will show every way you can draw a book.
I’m a huge reader myself and you’ll always find me with a book in my hand.
When you want to show your love for books, drawing these book doodles in your reading journal is a great way to do so. Or if you just want an easy way to make something look great, you can easily do so with these doodle ideas.
Normally, I keep a reading journal so drawing books like these are great for decorating pages and making them look pretty. Especially, if you’re sick of your journal looking standard.
Even if you’re not good at drawing, I’ll show you a really simple way to learn how to draw books in just a few minutes. You’re going to love this!
For this drawing tutorial, you can use an ordinary pen but I prefer using a micron pen. They’re waterproof so if you decide to color in these book doodles, you don’t have to worry about it smudging.
1. How To Draw A Notebook
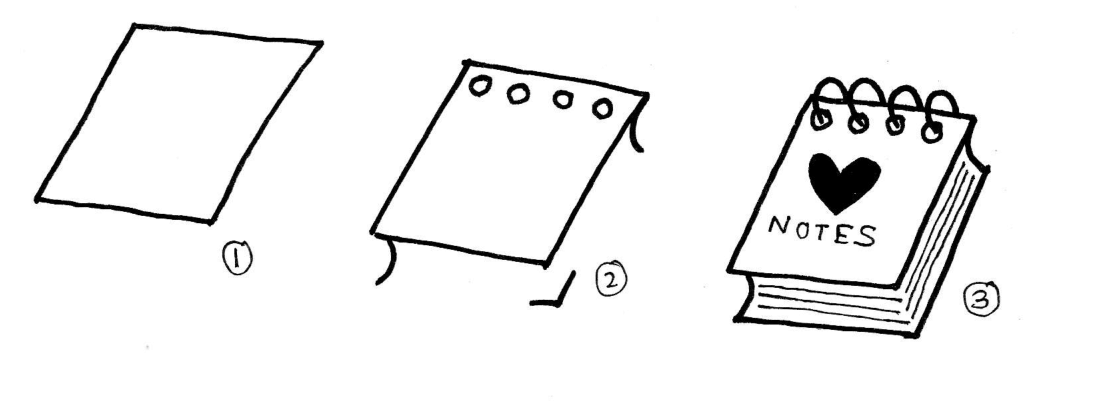
Before we start drawing books, let’s begin with an easy tutorial on how to draw a notebook. This notebook is adorable with the heart detail and it’s simple to draw yourself.
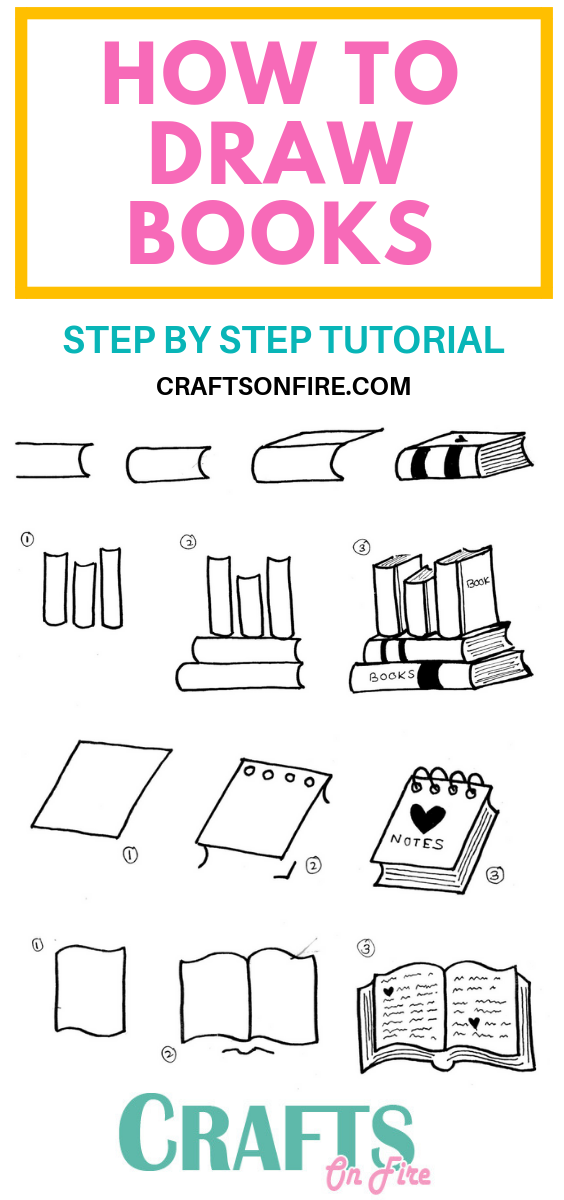
1. The first step is to draw a box at an angle. You can do this by drawing two straight lines at an angle and then joining them off with two horizontal lines on either side.
2. You’ll then need to draw two curves starting at the right side and then on the left side. You’ll also need to draw a small sort of angled V-shape to show the edge of the notebook.
3. Draw four small circles at the top of the box. This will be used for the spirals of the notebook.
4. Now all you need to do is join the lines together, from the first curve, to the edge of the notebook (the V shape) and the other curved line.
5. To complete your notebook drawing, you’ll now want to draw the spirals. You can do this by drawing a half circle from the small circles you had drawn earlier to the edge of the line of your top square.
Make sure to curve the line of your half-circle as you go from one small hole to the next.
6. For extra details, you can go ahead and personalize it any way you want. I just drew a heart shape and wrote the word ‘notes’ to finish off this notebook drawing.
2. How To Draw A Closed Book

Drawing a closed book is so much fun and definitely one of the easiest ways to draw a book out of all.
1. Start by drawing a log shape but make one end curved out and the other side of the log curved in.
2. The next step is to draw a line at an angle on the top of the log shape, creating a small slanted rectangle – this will be the top cover of the book.
3. You’ll then need to draw another line at the bottom and another curve at the end.
4. Finish off by drawing small light lines for the pages.
3. How To Draw Stacked Books

If you want to draw stacked books, just follow along with these four easy steps:
1. Start by drawing three log shapes with the top side curved in and the bottom of the log curved out.
2. Now draw two more logs horizontally, making the second log slightly bigger than the first.
Now that you have the basic shapes of the books, it’s time to put them together. You can choose to start with the top books or the bottom ones, it’s up to you.
3. For the top books, you’ll need to draw rectangle shapes to complete the books. Add smaller lines to indicate the book pages.
4. For the bottom stacked books, all you need to do is draw parallel lines at an angle and finish it off by drawing an inward curve. Repeat the same process for the last book.
SEE ALSO: How To Draw A Pencil
4. How To Draw An Open Book

If you want to draw an open book instead, then try this simple and cute design. We add an extra small touch like the heart, a bookmark at the top, and tiny scribbles to make it look like it has words.
1. First, draw a small rectangle shape with a curve on top and a wavy line at the bottom. You’ll want to join it with another shape just like this for the other side of the book. This will be the left and right pages.
2. Draw two lines at an angle from the top of the two book pages you just drew. Continue shaping the book pages with two straight lines by leaving a space.
3. Join the two book lines on either side of the book spine.
4. You can add the small page lines and the bookmark, heart, and scribbles if you want to. I just felt that adding these small touches makes this open-book drawing look more detailed.
5. Conclusion
There you go! Four amazing ways to learn how to draw a book in different styles. Did you like these book drawings? I hope you did.
But if you need a video tutorial, I highly recommend this more advanced tutorial.
Out of all, I tend to draw the notebook and stacked books more often since you can do quite a bit with them. If you’re jotting down homework or assignments to do, then these doodles look great next to those words.
Another fantastic idea to decorate these book drawings is by drawing leaves and flowers next to them. It will make them look more pretty and unique. Give it a try, I’m sure you’ll love it.
Let us know your thoughts in the comments below and also which of the book drawings you love the most.
Before we head off, if you’re in the mood for an adorable drawing idea, try this amazing clock drawing you can do in just a few minutes!