How To Draw A Clock: Adorable Alarm Clock Drawing

If you’re in the mood for a cute doodle idea, then try this awesome alarm clock drawing that is so kawaii it will have you squealing in joy. It’s also great if you’re looking to learn how to draw a clock that is both easy and adorable on so many levels.
We’ll show you a step-by-step tutorial on how to draw a clock in just a few simple steps. You can add this pretty drawing to your collection or add it to your bullet journal.
Even if you just want to draw a cute cartoon character, you can do it with this fun alarm clock drawing.
Supplies used:
For this drawing, all we used was an HB pencil to first sketch the alarm and then a micron pen .08 to ink the design. You might also need a black marker to outline and of course, a few colored markers to make the drawing look extra special.
Let’s begin, shall we?
How To Draw A Clock: Easy Step By Step Tutorial
Step 1: Draw a heart shape

For this drawing, the first step you’ll need to do is draw a heart shape. Make sure to curve the heart at the top and a little in the middle while narrowing it down towards the end.
Step 2: Add the legs

To make the alarm clock stand, you’ll need to draw two small circles on each side of the heart.
Step 3: Drawing the bells (part 1)

Once you’ve drawn the two circles at the end, you’ll now have to move towards the top of the heart. Draw two lines in an angle on both sides of the heart.
Step 4: Drawing the bells (part 2)

Once you have the lines drawn, you can draw a curved line over the two angled lines you just drew. These are for the alarm bells.
Step 5: Drawing the bells (part 3)

You’ll now need to complete the bells by closing off the curved line. Simply draw a half circle from one end of the curved line to the other. Do the same same thing for the opposite side.
Step 6: Drawing the stopper

Now that you’ve completed the drawing of the bells, let’s draw the next part. In the middle of the heart shape, draw two small lines. Next, draw a rectangle joining those two lines, as you can see in the drawing.
Step 7: Add the numbers
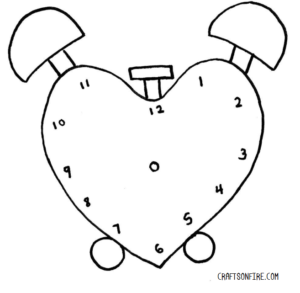
Would you believe it but we’re almost done! Next up, you’re going to need to draw a small circle in the middle of the heart clock. After you’ve done that, go ahead and add the numbers of the clock.
Step 8: Give it cute eyes
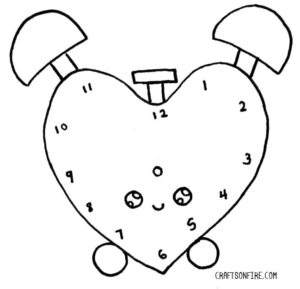
Now you can leave this part plain but if you want to make your alarm clock drawing look adorable, then add these eyes. You’ll first need to draw two small circles and then draw two more circles in each of the eyes. In between those eyes, draw a small smile.
Step 9: Color in the eyes
Remember when we drew those two small circles in each eye? Now we’ll need to shade in between those two circles so that when it’s shaded, the two small circles will still be white.
Step 10: Draw in the time
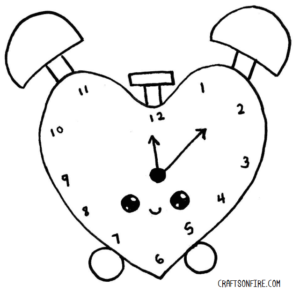
Every clock needs its hands to tell time, am I right? Draw one straight line running to 12 and add a small arrow to complete the hand.
Next, you’ll need to draw a longer line at an angle pointing at the number 2. You can also shade the circle in the middle of the clock if you want to.
Step 11: Make it ring
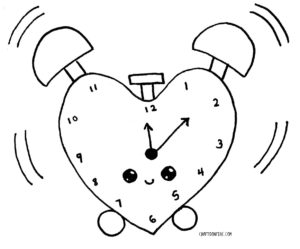
To make it look like your clock drawing is ‘ringing’ draw lines around the shape.
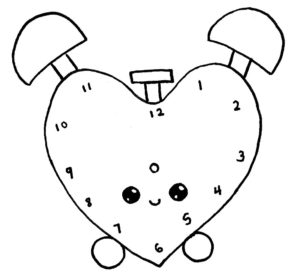
Step 12: Draw more shaded hearts
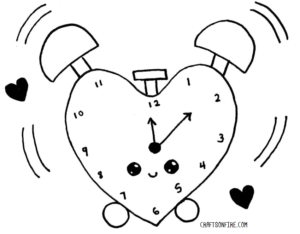
You can also add two shaded hearts on either side of the drawing just to add a bit more detail.
Step 13: Outline the drawing
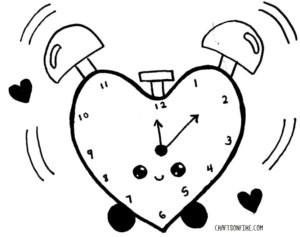
Once you’ve completed all the other steps, you can now go back to outlining the shape of the heart clock and shade in the circle stand.
And we’re done! Wasn’t that really easy to draw?
Step 14: Color the clock (optional)
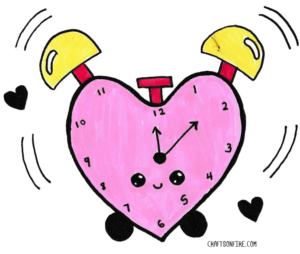
This step is optional but if you do want to color in the drawing, go ahead and use as many colors as you like. But it’s not necessary since the drawing itself looks cute, don’t you think?
Conclusion
Drawing a clock is easy, especially if you’re drawing a cute cartoon clock. It just takes a little bit of creativity and lets the mind and your hands do their own thing.
A great way to make an ordinary drawing look amazing is to give it extra details or you can make a boring drawing stand out by simply outlining certain areas of the drawing.
Here we showed you a detailed way to draw a cartoon alarm clock, but if you’re looking to learn how to draw an ordinary clock, then you can find one here.
Also, if you’re a huge fan of drawing cute things, then you’ll be interested in learning how to draw flowers.