How To Draw A Pencil: Cute Pencil Drawing
Are you interested in a small cute drawing project that is both quick and easy to draw? Then you’ll probably love to know how to draw a pencil in just a few simple steps. It’s perfect if you’d like to decorate pages with a school theme or just fill up extra blank pages, whatever you plan to use this pencil drawing for, I’m sure it will turn out great.
Before we head over to the tutorial, did you know that approximately 2500 pencils can be made from 1 single tree and a single pencil can write just about 45,000 words? That’s pretty amazing, don’t you think so?
Okay, I don’t want to bore you with facts about pencils, I’m sure you’re not here for that.
Let’s draw!
How To Draw A Pencil
Supplies You’ll Need:
- Pencil
- Paper
- Eraser
- Markers
- Micron pen (or any fine liner)
Instructions
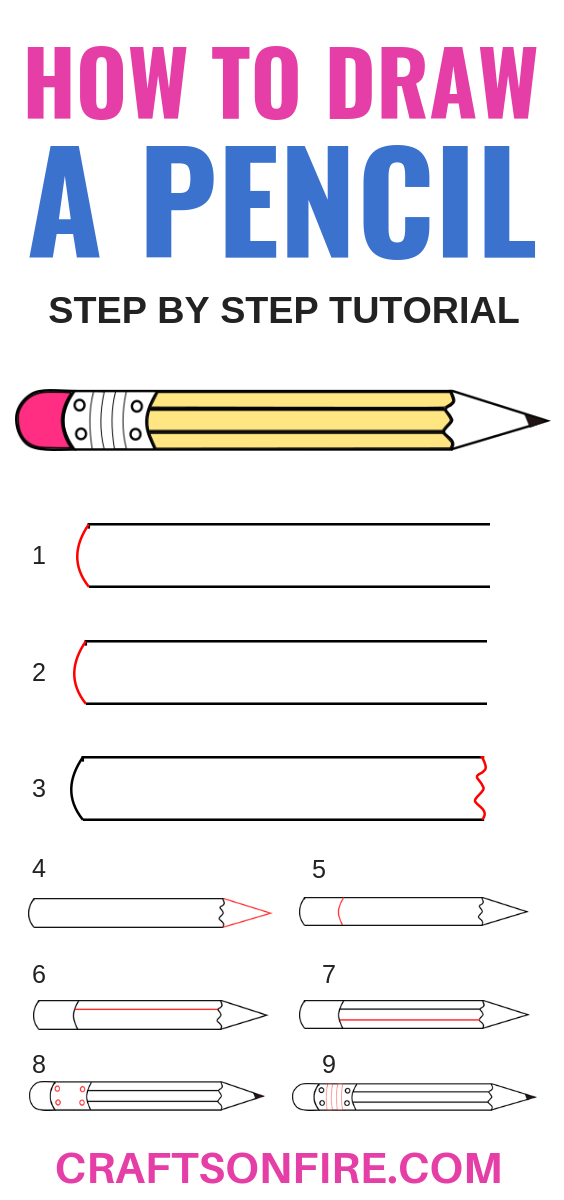
Step 1

Begin by drawing two straight lines with a good enough distance. You can draw these lines longer depending on the size of your pencil, whether that is a long or short pencil.
Step 2

On one side of the pencil, join the two lines you just drew by drawing a curved line outwards.
Step 3

Then head over to the other side and draw a wavy line as shown above.
Step 4

Once you have completed drawing a wavy line, it’s time to draw a triangle shape for the pencil. You can do this by drawing one line at an angle and bringing that line down at an angle while joining it to the other end of the curvy line.
Step 5

Head over to the other side of the pencil and leave a little bit of space from the outward line you drew earlier and draw another one just like that.
Step 6

Remember the wavy line you drew a few minutes ago? Join one part of the wave to the other end of the pencil.
Step 7

Now add another line just as you had done previously.
Step 8

Most of the pencil is complete but don’t forget to shade a bit of the triangle at the front to show the pencil lead. Do this by drawing a line at an angle and shading it in black. You can make this portion bigger or smaller, depending on your preference.
Step 9

Now you’ll need to draw the rubber of the pencil. From one end of the pencil, draw a slightly curved half circle and join it to the other line of the pencil.
Step 10

If you notice carefully, some pencils have a sort of metal end before the rubber and there are four small holes in it. Draw these holes with equal space between them.
Step 11

Now draw four small lines in the middle of the circles but make sure that they’re slightly curved. And your pencil drawing is now complete.
Step 12

All that is left is to color the pencil drawing. Use a bright shade of yellow for the pencil and a bright shade of pink for the rubber. You can shade the other parts with light shades but I felt this pencil drawing stands out more when you leave them white.
Conclusion
Pencils come in all different colors and sizes so go ahead and use whichever colors you’d like. There’s no reason to stick with just the yellow and pink combination but they’re all pretty great anyway.
SEE ALSO: How To Draw A Book: Easy Step By Step Tutorial You’ll Love
If you enjoyed learning how to draw a pencil, leave a comment below, and don’t forget to pass this drawing tutorial along by sharing it with your friends and family.
As always, we love to hear your thoughts on these drawing ideas, so do let us know if you like drawing a pencil!
See you in the next drawing tutorial.

this is good